Complete step-by-step instructions for assembling a macaron box set with simplex base and sliding outer sleeve. Perfect for macarons, candies, or dainty baked goods.
-
Introduction to the macaron box set
This set is comprised of a simplex base and a sliding outer-sleeve. Together, they make for a slick matchbox-style package, perfect for macarons, candies, or your more dainty baked goods.

-
Background and design improvements
Although we spent more time than usual developing the design of this structure, we cannot take credit for its induction into the BRP Box Shop catalog. Before generous customers asked for this box, we didn't even know what a macaron was (aside from the idea that a macaron is a macaroon, misspelled). A special thank you goes out to the bakers who helped us with this, especially those of you in the Windy City. This little macaron box set has taken off just as we hoped it would, but the initial structure required a lot of steps to make it look perfect. We changed some things and this new design will have your cookie presentation looking just as good but in fewer steps and less fuss.
-
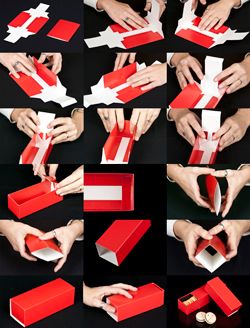
Start with the simplex drawer
To get started, we'll first focus on the simplex 'drawer'. This is the package element that slides through the sleeve. Pre-break the innermost fold at both ends of the box. It is easier if you pin the middle of the box against a clean flat surface with one hand while folding your panels with the other.

-
Bend end panels to 90 degrees
Bend the end panels up to about 90 degrees. Don't go crazy and fold them all of the way over so it's flat. This could buckle the paper fibers and even put cracks in the printed surface.
Warning: Only fold to 90� to prevent cracking the printed surface!

-
Pre-break the side panels
This next verse is a lot like the first but now, it is the side panels getting the pre-break treatment. Again, bend them up to about 90 degrees.

-
Continue side panel preparation
Continue the side panel pre-breaking process on the other side.

-
Button up the ends with gussets
With all four cookie box walls prepped, it's time to button up the ends of this macaron box base and that means we are already nearly done. The funky-shaped paperboard parts with the dotted line cut into them at an angle, are called gussets. The gussets actually fold into the cookie box base as you pull the three adjacent walls up.

-
Fold gussets flat against end panel
The walls come all the way up and the gussets get folded all the way in. When both sides of the gussets are flat against one another along that dotted line, pin them snug against that unprinted side of the end panel.

-
Use fingers to hold gussets in place
You can use your index fingers to hold the gussets against the inside of the macaron box. This frees up your thumbs to push the remaining panel over the top and into the drawer.

-
Push panel down and position the foot
Push this panel down, swinging it around the fold like a hinge. That little piece at the end of this panel is called the foot. The foot hugs the bottom of the box at a 90 degree angle to the side panel. Proper placement of your foot makes sure your box is all locked up and looking pretty. Go ahead. Put your foot down!

-
Ensure foot is properly locked
It is important to make sure the entire bottom of the foot is flat against the bottom of the box. This means the foot is locked behind and on the same plane as, the elements at the bottom of the macaron box coming off the side panels. It's a good idea to reach your fingers into the inside corner of the box and give it a pinch to make sure that foot is snug. In the picture below, it's almost there but not quite yet.

-
Perfect end panel assembly
Lower your eyes to the photo below and see that the fully assembled end panel has a pretty precise finish. The foot is locked perfectly into place with no overlap. Do the same thing to the other end of the box and the next part is as easy as it could possibly be.

-
Choose and prepare the sleeve
With the base complete, your macaron box set is lacking only a sleeve. Choosing your sleeve is harder than setting it up (windowed or not windowed, match the color to the base, or change it up with a different color?). With a little pressure, the sleeve just pops open.

-
Squeeze edges to open sleeve
Squeeze the edges of the sleeve and watch the magic happen.

-
Locate the glued seam
Each macaron box sleeve has a glued seam.

-
Position seam facing down
The glued seam should be facing down.

-
Slide box into sleeve
Sliding the box into the sleeve is the most intuitive part of this holy union.

-
Access the contents
Gaining access to the goodies of this closed box is as easy as pushing a button. Secure the sleeve and give the drawer a little shove from the end of your choosing.

-
Completed macaron box set
Your macaron box set is now complete and ready to showcase your delicate treats!