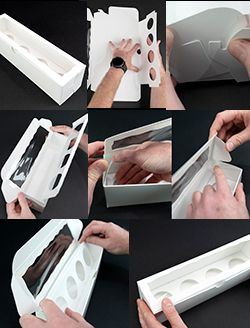
Complete step-by-step instructions for assembling a chocolate bomb box with tray. Learn the proper sequence and techniques for professional results.
-
Important: Fold tray AFTER securing sides
Let's skip right to the most important part of these instructions: Fold the tray down into the box AFTER setting up the sides. Secure the hooks on the sides BEFORE folding in the tray or there may be hassle.
Critical: This sequence prevents assembly problems!

-
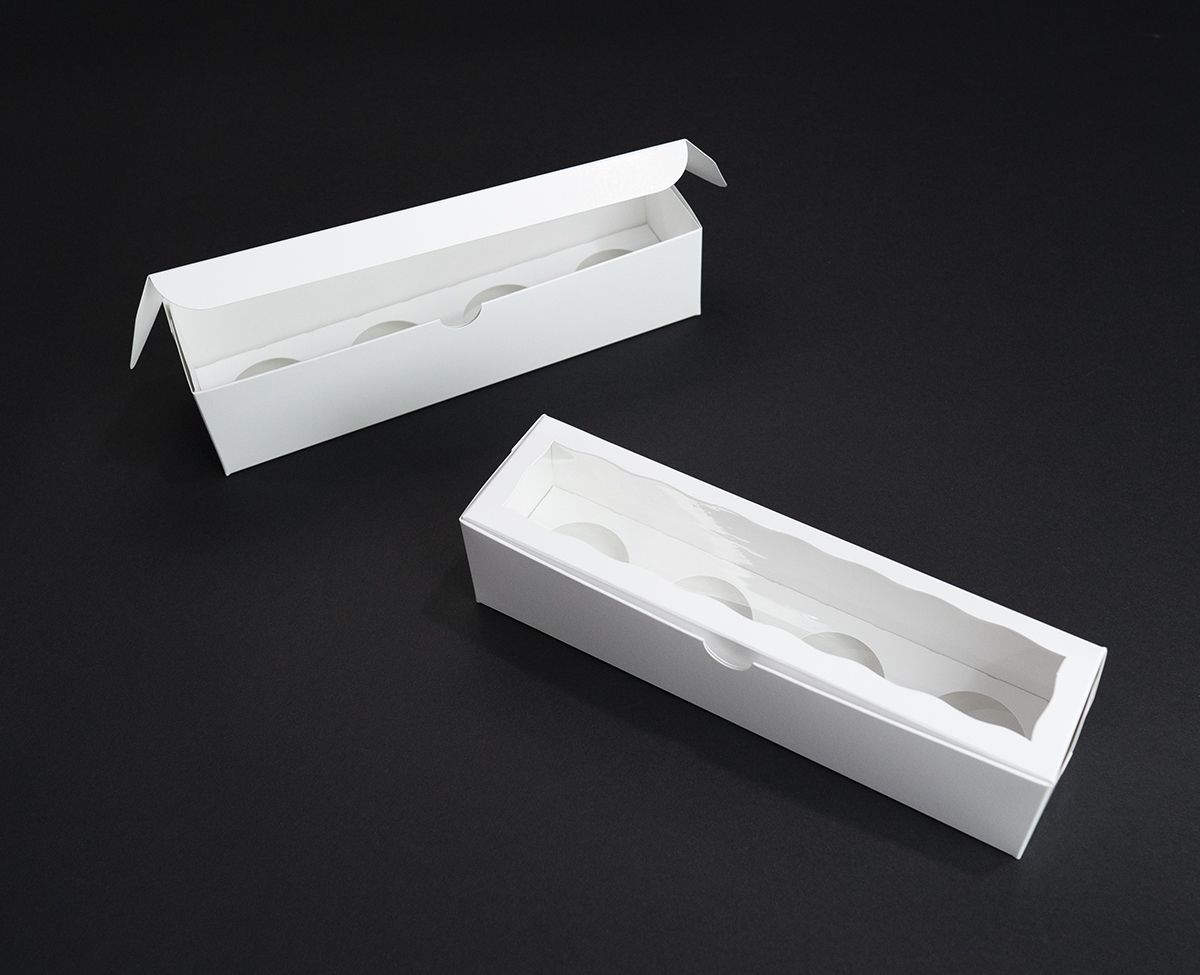
View the completed box
With that spoiler out of the way, let's get back to the beginning, starting with the end. Here is what a completed box should look like.

-
Start with pre-breaking window panel scores
The picture below is what a chocolate bomb box looks like fresh out of its shipping case. Lay the box on a flat surface with the inside (dull side) facing up. Begin by pre-breaking the paperboard fibers along the creases by folding the panels over 180 degrees. Start with the window panel scores. Pin down the window panel by pushing fingertips down on the inside window frame, right next to the fold line.
Avoid touching the open window-film-only area to prevent fingerprints.

-
Fold panel all the way over
Fold that thing all the way over to 180 degrees.

-
Continue with other window side
After folding panels in, fold them back open and move to the next long crease line. Let's do the crease on the other side of the window next. Use fingertips to pin down the paperboard material right next to the score on the window panel. Unfold it like the other one then move on to training the other scores.

-
Special handling for thumb hole crease
Now, when you get to the crease that runs through the thumb hole, go ahead and fold it over then stop without unfolding it. We will do something weird with the tray panel while it is still folded in.

-
Backfold the tray panel
The tray panel gets backfolded on the crease line next to the big bomb hole(s). Bend the tray the other way: smoother-side against smoother-side with the bottom dull-side of the tray facing up. Check out the image below. Unfold it again when you are done.

-
Pre-break smaller side panels
Go ahead and get to pre-breaking the creases on the smaller side panels.

-
Fold tray feet down
Get those feet on the perimeter of the holey tray too. The stubby tray feet fold down, dull-side to dull-side, conventionally, like any not-odd panel. Now is a time to check to make sure you have addressed all of the scores and not missed any. This pre-folding routine will not only make the box easier to assemble, it will also give you a more handsome structure when you are done.

-
Tenderize the long edges
Before we get to actually setting up the box, it can be a good idea to give the two long edges/creases of the lid and the bottom edge of the front panel, some special attention. You can fold over these scores and then pinch the two layers of paperboard between your fingers and carefully run down the edge, warping the paper a bit but being careful not to crinkle in it. The more these scores are tenderized, the sharper the edges of the finished box will be.

-
Fold back the lid slightly
Before the next steps, it is a good idea to fold back the lid a little bit. Don't go all the way back � just enough so it is out of the way for when you set up the sides and for later when you swing the tray into the belly of the box.

-
Lock up the sides with hooks
Let's lock up the sides. Fold up the middle inside panel (the one without a hook or slot in it) so it is at 90 degrees to the bottom. With that up, fold over the panel with the #7-shaped slot. Hold the slotted-panel with one hand and grab the hooked panel with the other. Make sure the slot opening is puckered open to receive the hook.

-
Secure hooks behind slots
The full body of the hook slides behind the paperboard with the hook catching behind the top of the slot from the inside. When done right, the business-end of the hook is hidden like in the picture below. Do this to both sides.

-
Now swing the tray inside
With the sides secured, now is the appropriate time to swing that tray over and inside of the box. Just make sure the feet are down at 90 degrees so they clear when you flip the tray in and so they support the tray and your spheres of yum.

-
Tray positioned inside box
The tray is now properly positioned inside the box with feet supporting it.

-
Fold lid wings down carefully
Next, fold the lid wings down to 90 degrees to prepare them to slide, sandwich-meat-style, between the inner-side panel and the two panels you hooked up on the outside. While starting the wings down and in, cheat them towards the inside of the box as you lower them into the gap. Pushing them in a little as you go down will ensure you do not get snagged by the top of the hooks.

-
Guide lid tongue inside front panel
While guiding those wings in, use your thumbs to coax the lid tongue down inside front panel of the box.

-
Final touches and completion
Paperboard has memory and wants to spring back to flat. This can make panels pucker a bit. Dressing up the corners of the lid by pinching on the edges to take some of this memory away and make a noticeable difference in the appearance of your packaging. You can do this on the bottom front edge too if you want the sharpest box possible. You are done! Once you get the hang of it, you will be able to fold hundreds of thousands of boxes in the time it took me to assemble these verbose instructions. Thank you for selecting BRP boxes to provide the showcase for your cocoa bombs.