Complete step-by-step instructions for assembling a cake pop box and stand. Learn how to properly fold, attach, and secure all components for professional results.
-
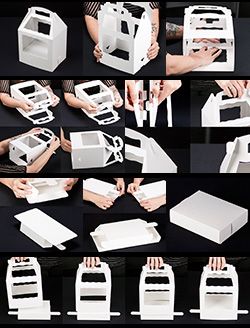
Review parts out of the box
This is what you'll see out of the box. Lay the sleeve on a flat surface with the stand closest to you and the gable top away.

-
Form the first side wall (avoid the window)
Slide your right hand inside the sleeve near the crease and pin the inside wall. With your left hand lift the outer panel to 90° on the score.
Warning: Do not push on the window; support the paperboard frame around it.

-
Repeat for the opposite side
Flip the sleeve and repeat. Strategic finger placement prevents false scores (unwanted creases in the wrong places).
-
Square the sleeve into a box shape
After initial creases, bring side walls to 90° so the sleeve takes a box-like shape.

-
Pre-break the windowed gable panels
Reach through the bottom, pin the lower wall, and support the windowed top panel. Fold the gable over to at least 90°. Flip and repeat on the other windowed panel.
Warning: Use the paperboard for leverage - not the window. Support the bottom corners of the windows while lifting so the panel creases only on the manufactured score.

-
Pre-break the triangular side gable panels
Fold the triangular sides. These are easier - no window means a lower chance of false scores.

-
Fold the gable wings
With one hand inside just inside the wing score, fold each wing up to at least 90°. Take your time to prevent creasing the windowed panel where there is no score.

-
Pre-break the handles (away from center)
The handles fold back and away from the center - the opposite direction of earlier creases.

-
Fold handle tabs down
Handle tabs fold in the opposite direction of the handles.

-
Interlock handle tabs & attach side panels
Inside handle tabs interlock like crocodile teeth. Bring the windowless triangular side panels down - the handle crooks go through the diamond holes to hold them.
Warning: Do not press down on the handles while attaching.

-
Groom any bulging creases
Use fingertips to smooth any bulges for a symmetrical, clean look.

-
Pop up the tray (don't exceed 90°)
Place hands on either side and press in along the folded bottom edges to pop it up. Ensure walls are at 90° and the bottom is square.
Warning: Do not go past 90° to avoid tearing internal elements.

-
Fold dust flaps in
Fold the dust flaps on each side into the tray.

-
Pre-fold long end tongues
Lay the stand on its back and use the flat table surface to fold the tongues up on both ends.

-
Fold end flaps into the stand
With dust flaps folded in, fold end flaps into the stand. They may not stay - the sleeve and locking tabs will secure them later.

-
Start end flaps, then slide the sleeve on
Begin inserting the end flaps, then slip the top sleeve over the stand.

-
Fold tongue lock tabs to 90° (no more)
Fold up each tongue lock tab to exactly 90°. Do not over-fold.

-
Locate tongue lock notches under the sleeve
The tongue lock straps fold up inside the notches at the bottom of the sleeve.

-
Insert tongue lock tabs into arched slots
Place the tab tips into the top of the triangle and into the arched locking slots of the stand. Keep the tab square to the slot and push straight.
Warning: Keep the paperboard parallel to the surface to avoid false scores.
-
Remove sleeve safely when needed
To remove, pull each locking tab straight out of the arched slot so it doesn't mangle.

-
Tidy stand when using without sleeve
When the stand is used alone, place the locking tongue tabs into the locking slots to keep things neat.

-
Display with or without the top
If tabs were inserted and removed carefully, the display looks great topless or with the top on. Nicely done - the toughest box is complete.